There’s that one moment in spring that we all wait for: When the cherry trees bloom, the world briefly looks as if someone had sprinkled powdered sugar all over it. Everything seems delicate, fleeting and somehow almost unreally beautiful. But what should you do if this moment has not yet come or the next cherry tree is too far away? It’s simple: we make our own cherry blossoms out of napkins and bring spring straight into our living room.
Cherry blossoms made from napkins: Easy DIY for everyone
The nice thing about this idea is that you don’t have to be a professional to do it. No expensive craft supplies are needed, preparation doesn’t take hours, and no complicated technique is required. If you can hold a pair of scissors and tie a simple knot, this is the place for you. We’ll show you step by step how a simple white napkin can be turned into a delicate flower that makes every vase, every branch and every window decoration shine.
And one more thing: These little cherry blossoms made from napkins are not only incredibly easy to make, but also addictive. Once you start, you can’t stop – and suddenly you have enough blossoms for an entire cherry tree in your living room. Which is of course beautiful. So, grab your napkins, let’s get started!
Reading tips: If you like DIY flowers, you’ll love these ideas! For example, make spring-like daffodils out of coffee filters or ranunculus out of paper. A whole bouquet of pipe cleaners is also possible. Just try it!
Cherry blossoms from napkins
Claudia
- 1 Paper serviette (3-layer) z. B. in Pink 🛒 or White 🛒
- 20 cm white sewing thread
- 2 small decorative beads z. B. here 🛒
- optional: watercolor or thinned acrylic paint
- Peel a single, wafer-thin layer away from the napkin – most napkins have three layers, so you only need one of them.
1 Paper serviette (3-layer)
- If you want colored cherry blossoms – for example in soft pink or old pink – you can now color the removed napkin layer. To do this, lightly dab some watercolor or thinned acrylic paint onto the layer using a brush or sponge and allow it to dry completely before continuing.
optional: watercolor
- Cut the individual layer into strips approx. 4 cm wide.
- Take a strip and fold it several times into a small, compact package.
- Cut an oval about 5 cm long from the folded package. You get a whole stack of even petals with one cut – practical!
- Cut a piece of sewing thread approximately 20 cm long and thread a decorative bead onto it. Then pull both thread ends together through the eye of the needle to create a double thread.
20 cm white sewing thread, 2 small decorative beads
- Take a stack of 5-6 petals, insert the needle through the bottom of the stack and pull the double thread all the way through.
- Thread a second decorative bead on the other side of the petal stack. Then pull one of the two yarn threads out of the eye of the needle, thread the remaining thread again from bottom to top through the second bead and then knot both yarn threads tightly together.
- Hold the two beads firmly with your thumb and forefinger and carefully fan the individual petals in a clockwise direction with your other hand. Proceed calmly and carefully – the napkin paper is very delicate.
- Knot the two ends of the yarn together to create an approx. 6-7 cm long loop that you can use to hang the flower later.
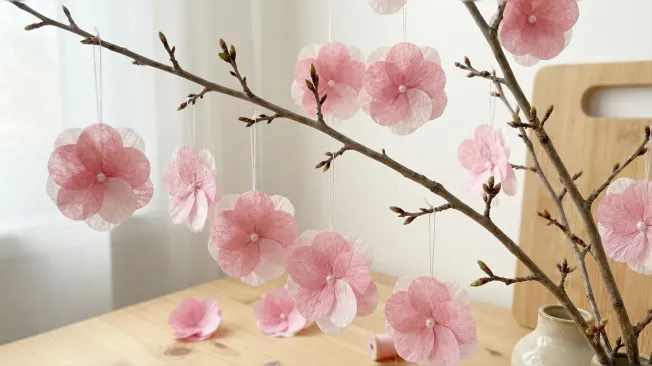
Hang the finished cherry blossoms on branches – for example on withered wild perennials such as yarrow or chicory, which you can find for free along the way. These are light as a feather and look beautiful as a natural base. Bends and folds in the petals are not a defect, but rather give the flowers character! Even real cherry blossoms are not flawless. That’s exactly what makes this DIY variant so charming.