Wooden balls are a material that you immediately know: you can make something beautiful with them. Its round, smooth shape radiates a natural warmth that hardly any other material conveys so easily. A flower pot made of wooden balls is therefore more than just a pretty accessory: it is truly unique and adds a special touch to any home.
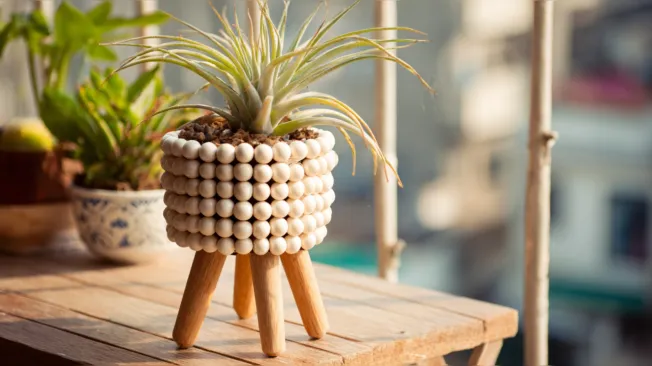
Flower pot made of wooden balls
The wonderful thing about this project is that the flower pot can be easily adapted to your own taste. The balls can be painted or glazed as desired, for example in muted earth tones, bright colors or a natural wood look. The feet made of round wood are just one of many options. If you want, you can use small metal feet, felt gliders or even cork discs instead and easily create a different style.
The best thing about it: You don’t need any special prior knowledge or expensive tools for this DIY. It is suitable for everyone – from craft beginners to creative professionals. We will now show you step by step how to create your own flower pot. Let’s get started!
If you like the natural look, you should definitely try these braided wrapping paper pots. Natural materials such as branches are also wonderful for beautifying boring planters. For a modern and clean look, we recommend this stone-look pot.
Flower pot made of wooden balls
Claudia
- Wooden balls without holes z. B. here 🛒
- weatherproof wood protection varnish, exterior glaze or boat varnish to protect the wooden balls from moisture and UV radiation
- Clear varnish or exterior varnish for sealing the flower pot
- 4 Pieces of round wood z. B. here 🛒
- Working document
- 1 flower pot made of weatherproof material (e.g. plastic or galvanized metal)
- weatherproof assembly adhesive (transparent)
- 1 brush for applying varnish and glaze
- First prepare your flower pot and have all the materials ready to hand. Make sure the surface is clean and dry so that the glue sticks well.
- Would you like to put your flower pot outside later? Then treat the wooden balls with wood protection varnish, exterior glaze or boat varnish before sticking them on and let them dry completely. This means that the spaces between the balls are also well protected later.
wooden balls without drilling, weatherproof wood protection varnish, exterior glaze or boat varnish
- Apply the weatherproof assembly adhesive to the first wooden ball and fix it close to the pot. Hold the ball briefly until the glue sets.
- Glue the remaining balls directly next to each other until the entire bottom row is completely enclosed.
- Glue the next row of balls offset from the first row – similar to building walls. This creates a nice, even pattern and the balls are more stable.
- Continue row by row, always staggered, until the entire pot is covered with balls. Allow to dry briefly if necessary.
- Finally, glue the four pieces of round wood evenly spaced to the bottom of the pot. They serve as stylish feet and give the pot a great stand.
4 pieces of round wood
- After the glue has completely dried, apply a final coat of wood or boat varnish over the entire surface, including the spaces between the balls.
Clear varnish or exterior varnish
- Also seal the pot itself with a weatherproof exterior varnish.
- Let everything dry completely and then admire your finished work – your very own, handmade flower pot made of wooden balls!
Now craft
There are hardly any limits to your imagination when designing your flower pot. The wooden balls can be wonderfully painted with acrylic paint or treated with wood stain in different tones before sticking them on – so the pot fits perfectly with your own interior style. If you like it natural, simply leave the balls in the original wooden look and emphasize the grain with a simple clear varnish. A mix of painted and unpainted balls can also create a beautiful effect. It’s also worth getting creative with the feet: small industrial-style metal legs, decorative wooden discs or simple felt gliders are just a few of the options for giving the pot your very own touch.