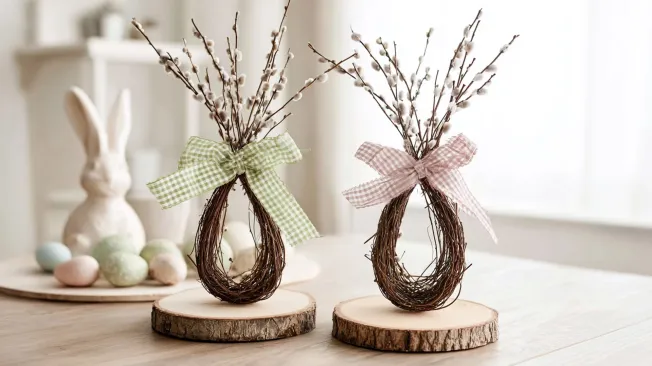
Spring arrives, the light becomes softer and suddenly you feel like fresh, natural Easter decorations. The Easter egg branches, which stand on a wooden disc, capture exactly this mood: curved egg-shaped branches that elegantly end at the top, held by a pretty bow and firmly anchored on a piece of wood. The arrangement appears light, modern and at the same time pleasantly close to nature – perfect for the dining table, chest of drawers or windowsill.
Easter egg branches on a wooden disc as a quick Easter decoration
Branches are an excellent and extremely popular craft material because they bring beautiful lines and excitement to your decoration. Sometimes they look delicate and delicate, sometimes rustic and woodsy – depending on which branches you use. Curved into an egg shape, it creates a clear, Easter-themed reference without having to use a lot of color or additional decoration. The structure of the branches ensures that the arrangement looks interesting even from a distance, while the wood creates a warm, earthy base.
At the same time, this DIY is surprisingly uncomplicated: you just need a few twigs, wooden discs, ribbon and hot glue and you’re ready to go. You’ll be able to complete the project even if you rarely do crafts, because all the steps are easy to follow and completed quickly. In a short time you can create an Easter decoration that you can vary according to your taste – from minimalist in natural tones to playful with pastel bows and small decorative eggs. This is how you can bring a piece of spring forest into your home in just a few simple steps.
Tipp: Here you can find more beautiful ideas for decorating with branches and twigs. You might also like these birch branches in the glass bowl.
Easter egg branches on wooden slice
Melanie
- flexible, thin branches
- round wooden disc with bark
- Ribbon in spring colors or with a checked pattern
- optional: small decorative eggs, feathers or mini flowers for the base of the Easter egg branches
- Sort the branches by length and trim them with pruning shears so that all arrangements are approximately the same size.
flexible, thin branches
- Gather several branches into a bundle and carefully bend them into a closed egg shape with the ends overlapping at the bottom.
- Secure the overlapping ends with a dab of hot glue until the shape is stable.
- Apply a generous amount of hot glue to the center of the wooden disc and press the Easter egg branches until the glue has hardened.
round wooden disc with bark
- Gather the branches above the egg shape, let them taper loosely towards the top and tie a wide ribbon at this point to form a decorative bow.
Ribbon
- Repeat the steps for additional decorative branch eggs if you want to create a small ensemble.
- Arrange everything on a table or the windowsill and add decorative eggs, candles, small rabbit figures or some moss as desired.
optional: small decorative eggs, feathers or mini flowers
Combine twig eggs of different heights to make the arrangement appear more lively. Play with different ribbons: checked pattern looks cozy, linen ribbon looks more natural, satin ribbon looks elegant. Add small accents by gluing some moss, mini eggs or feathers to the base of the decoration. For a Scandinavian minimalist look, stick with natural tones and simple bows. For a playful style, you can use pastel colors, polka dots or floral patterns on the ribbon.