Finally we can work in the garden or on the balcony again, enjoy the sun and enjoy the wonderful greenery! As a special eye-catcher, our DIY causes a stir: the concrete garden stakes look spectacular and give your flowers and plants the stage they deserve. In this article we will show you how you can easily make them yourself. Since decorations from the garden center are often quite expensive, our concrete garden stakes are the right choice. The decorative plugs not only decorate your beds, but are also easy-to-make and inexpensive eye-catchers on the balcony and terrace.
Decorative DIY to make yourself: garden stakes made of concrete
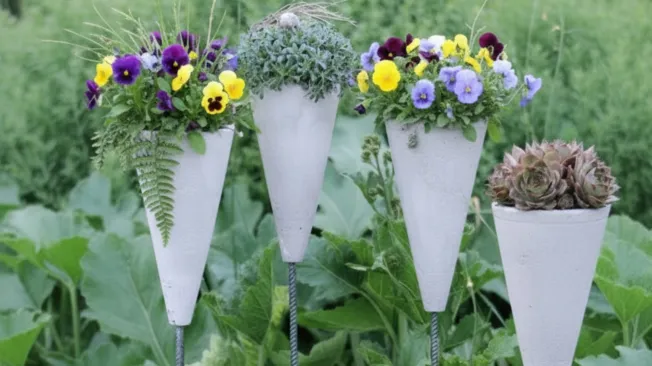
You don’t need a professional workshop to make the garden stakes out of concrete. A few simple pylons, some concrete and a metal rod – that’s basically all you need. The cone becomes the mold and the concrete then forms a stylish plant bowl. Thanks to the metal rod, you can use the plug anywhere in the bed, in the flower pot or as a path barrier. Succulents look particularly beautiful in the modern concrete plugs, but other flowers also add beautiful accents.
In the following instructions we will show you step by step how you can make concrete garden stakes from simple pylons and what you should pay attention to. Have we piqued your interest? Then get on the concrete and off you go!
Reading tips: Are you looking for more DIY ideas with concrete? Then take a look at how these elegant concrete eggs with gold rims work, how you can make this concrete vase in Scandi style and how these candlesticks made from a Gugelhupf mold work.
Concrete garden stake
Stefanie
- 2 Pylons about 24 cm high, e.g. B. online here 🛒
- 1 Metallstab approx. 8 mm thick and 75 cm long
- something cooking oil
- 750 g Creative concrete z. B. online here 🛒
- Stones to complain
- small stones for the drainage layer
- something Potting soil
- Succulents
- Take a pylon and use the drill to screw an 8 mm diameter hole into the top.
2 pylons
- Turn the pylons with the opening facing upwards and push the metal rod from below through the tip into the inside so that it protrudes about 6 cm into the cone.
1 Metallstab
- Place two chairs with the backs together and “hang” the prepared cone between them. The metal rod should rest securely on the ground. Use a spirit level to check whether everything is straight.
- Glue the pylons to the backrests with some adhesive tape.
- Brush the inside of the cone with a little oil.
some cooking oil
- Take a second pilone and brush the outside of it with oil. This makes it easier for the concrete to come off both forms later.
2 pylons
-
Mix around 750 g of creative concrete with water according to the instructions on the package until a thick, mushy mixture is formed. Tipp: Use gloves when working with concrete.
750 g Creative concrete
- Using the metal rod, fill the cone about halfway with the concrete.
- You now weigh down the second cone, which you previously brushed the outside of with oil, with stones.
Stones
-
Push the weighted cone into the fresh concrete until it hits the metal rod. Tipp: Make sure that the cone sits in the middle and that the edge is approximately the same thickness everywhere.
- Allow the concrete to harden for a good two days.
- Once dry, pour the stones out of the inner cone.
- Gently squeeze the inner cone slightly – this will make it easier to pull out.
- To loosen the outer cone, bend the sides slightly apart.
- Turn everything upside down and pull the pylons upwards over the metal rod.
- You can smooth any edges and rough spots with sandpaper.
- To plant the concrete garden stake, add a layer of small stones to the concrete cone as drainage.
small stones
- This is followed by some potting soil and succulents or other plants of your choice.
some potting soil, Succulents