Do you know that? You look into the garden on a sunny day and think: Something is still missing. This is exactly when our flower studs made of wire and beads are the perfect solution. They sparkle in the sun, bring color to dull days and transform every flower pot – whether indoors or outdoors – into a small work of art. You don’t need any prior knowledge, expensive materials or hours of preparation.
DIY flower studs made of wire and beads: The sparkling update for your plants
This DIY is one of those rare projects where the effort and result are in a really nice ratio. All you need is a bit of wire, a handful of colorful beads and a little patience while threading. We bend, twist and thread our way through the instructions together and at the end you hold a plug in your hands that looks just as good in the herb pot on the windowsill as it does in the summer flower bed on the terrace. And yes, you can do this relaxing in the garden under the apple tree.
Another little tip in advance: It’s best to do several at once. Firstly, it’s much more fun as a couple or in a group – there’s almost something meditative about threading the beads while having a good conversation and a cup of coffee. And secondly, these little plugs are also wonderful souvenirs that give every guest gift that certain something. A homemade flower arrangement made of wire and beads is guaranteed to be better received than a bottle of wine from the gas station.
Reading tips: You could use your flower plugs as decorations in this flower pot tower or in a DIY planter made from braided wrapping paper.
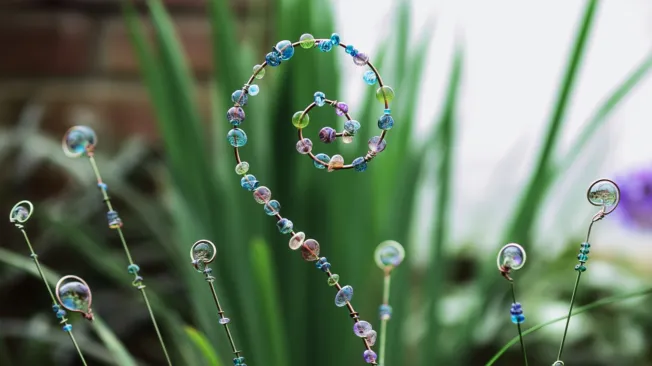
Wire and pearl flower studs
Claudia
- 30–50 cm aluminum wire silver-colored, approx. 2 mm thick (alternatively: galvanized wire)
- thin binding wire in silver ca. 0,5 mm stark, z. B. here 🛒
- colorful beads z. B. here 🛒
- First, think about what shape your flower arrangement should have. Spirals and hearts are popular, but teardrop or wave shapes are also well suited.
- Cut a suitable piece of thick aluminum wire – approx. 30-50 cm depending on the shape. It’s better to leave a little more, you can shorten it later.
30–50 cm Aludraht
-
Now bend the selected shape. To create a spiral, start in the middle. First form the smallest curve with the pliers and then work your way outwards with your hands.If you want to form a heart, bend the wire in the middle into a sharp bend with the pliers and then shape the two curves with your hands. Twirl the end of the wire tightly around the “stem” of the plug so that everything is securely fixed.
- Now cut off a generous piece of the thin silver wire – it’s better to be too long than too short. You can easily shorten excess wire at the end or lengthen it piece by piece if necessary.
thin binding wire in silver
- Thread the beads onto the thin wire. Leave some space after each bead (or after every two to three beads that you combine into a group) and wrap the wire around itself a few times directly behind each bead or group. This way each bead sits firmly in its place and does not slip later.
colorful beads
- Now wrap the finished beading wire around your curved basic shape. For more depth and a sculptural effect, you can let individual beads protrude slightly from the shape by gently bending the wire – it looks beautiful!
- Twirl the end of the thin wire tightly together and shorten it with the side cutters so that no sharp or protruding wire ends are visible.