Embroidery has become increasingly popular in recent years. In addition to classic embroidered tablecloths, embroidered accessories and clothing are particularly popular. But have you ever heard that you can also embroider baskets with flowers? Instead of classic embroidery thread, the seagrass baskets are embroidered with natural raffia. You can read here exactly how this works and how easily you can transform simple baskets into real favorite items!
Table of Contents: Embroidering baskets with flowers
You need that
Embroidering baskets with flowers: This is how it works
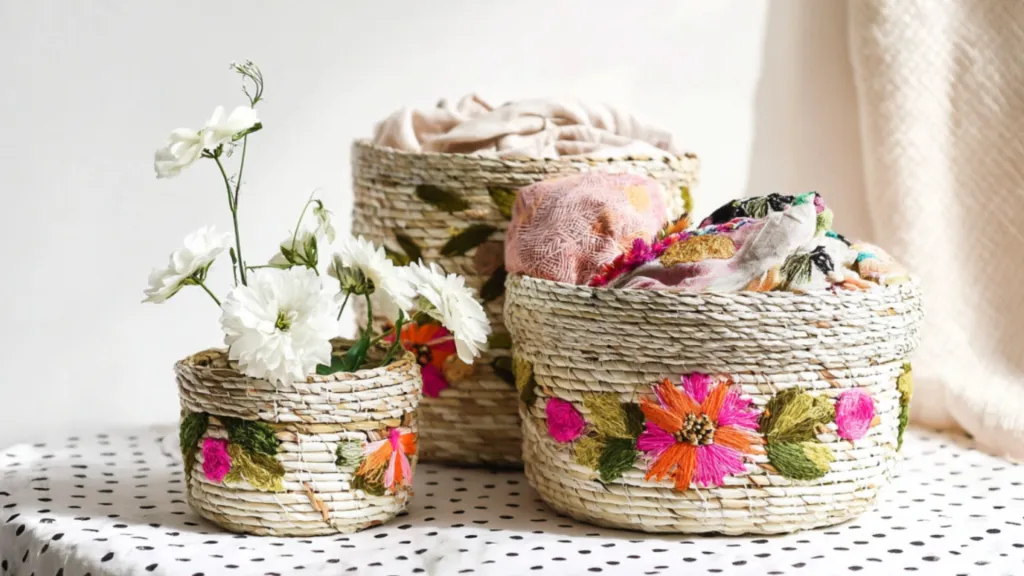
With our instructions you can easily embroider baskets with flowers. Credit: Midjourney: This image was created with the help of an AI.
You don’t need any special prior embroidery knowledge for this DIY. Everything works with simple stitches – almost as if you were painting on the basket with the natural raffia.
1. Motive the plan
If you look around online, you will discover a variety of embroidery motifs. The spectrum ranges from simple flowers to elaborate animals and entire documents. When embroidering baskets with natural raffia, you should limit yourself to simple shapes.
As a beginner, it is advisable to start with small points. To do this, thread the natural raffia through the needle and stitch through the side of the basket from the inside to the outside. Dots are simply stitched crosswise and give you a good feel for the material and technique. If you want to start with flowers right away, it’s best to draw the motif with a pencil.
Reading tips: Are you looking for more embroidery ideas? Then read here how you can embroider a bag with beads and how embroidering with hot glue works.
2. Embroider baskets with flowers
Flowers look particularly pretty on the baskets. To do this, start with the center of the flower, which you embroider crosswise like the previously mentioned points until a small circle is created. Then you work out the petals. To do this, poke through the basket with a different color close to the center of the flower and then poke the needle again through the seaweed into the inside of the basket about a centimeter away. Work out the petals by placing additional stitches to the left and right of the stitch you just made, each slightly shorter than the last. This is how the typical petal shape is created. Place a total of 5 petals around the center of the flower.
Once the first five petals are finished, take a second color and embroider another five petals in between. This creates depth and a beautiful color effect.
3. Expand flower field
Embroider additional flowers, small twigs and leaves around the first flower. You don’t need any complicated stitches here either – simple lines or circles are sufficient. Let your creativity run wild and play with different colors. You can then sew and knot the threads on the inside.
Tipp: If you feel confident, you can also embroider short names on the baskets. To do this, draw the letters in pencil and embroider them with a simple backstitch.
Gift idea with love
Your embroidered baskets make wonderful gifts for birthdays, Valentine’s Day, Mother’s Day or just in between. To do this, place a sheet of tissue paper inside the basket and fill it with small gifts. The baskets can then be used as decoration or as storage, for example for craft items. Embroidering baskets with flowers is a creative DIY that brings personality, color and spring vibes to any room. Try it out too! We hope you have fun imitating it.
Make an adorable tissue paper bunny craft on canvas! A fun and easy Easter project for kids using Mod Podge, tissue paper, and pom poms. When I was li [...]
Apply the Vinyl Decal Before applying the decal, clean the surface well. I like using a little isopropyl alcohol because it removes grease and dries q [...]
Step 5: Alternate Directions As you move through your hair, alternate the direction of each curl. Curl one section away from your face, then the next [...]
Make baked chicken fajitas in the oven for a simple, flavorful dinner that comes together fast with minimal prep. Some days call for a dinner that fee [...]
Published: Jan 16, 2019 · Modified: Dec 3, 2025 by Shelly · This post may contain affiliate links · 1 Comment Print off and enjoy this free Winter Col [...]
Graywash and Whitewash Once all the sheetrock compound had dried, I did a simple gray wash using a watered-down paint mixture. ( I mixed about 1 part [...]
We use cookies on our website to give you the most relevant experience by remembering your preferences and repeat visits. By clicking “Accept”, you consent to the use of ALL the cookies.
This website uses cookies to improve your experience while you navigate through the website. Out of these, the cookies that are categorized as necessary are stored on your browser as they are essential for the working of basic functionalities of the website. We also use third-party cookies that help us analyze and understand how you use this website. These cookies will be stored in your browser only with your consent. You also have the option to opt-out of these cookies. But opting out of some of these cookies may affect your browsing experience.
Necessary cookies are absolutely essential for the website to function properly. These cookies ensure basic functionalities and security features of the website, anonymously.
Cookie
Duration
Description
cookielawinfo-checbox-analytics
11 months
This cookie is set by GDPR Cookie Consent plugin. The cookie is used to store the user consent for the cookies in the category "Analytics".
cookielawinfo-checbox-functional
11 months
The cookie is set by GDPR cookie consent to record the user consent for the cookies in the category "Functional".
cookielawinfo-checbox-others
11 months
This cookie is set by GDPR Cookie Consent plugin. The cookie is used to store the user consent for the cookies in the category "Other.
cookielawinfo-checkbox-necessary
11 months
This cookie is set by GDPR Cookie Consent plugin. The cookies is used to store the user consent for the cookies in the category "Necessary".
cookielawinfo-checkbox-performance
11 months
This cookie is set by GDPR Cookie Consent plugin. The cookie is used to store the user consent for the cookies in the category "Performance".
viewed_cookie_policy
11 months
The cookie is set by the GDPR Cookie Consent plugin and is used to store whether or not user has consented to the use of cookies. It does not store any personal data.
Functional cookies help to perform certain functionalities like sharing the content of the website on social media platforms, collect feedbacks, and other third-party features.
Performance cookies are used to understand and analyze the key performance indexes of the website which helps in delivering a better user experience for the visitors.
Analytical cookies are used to understand how visitors interact with the website. These cookies help provide information on metrics the number of visitors, bounce rate, traffic source, etc.
Advertisement cookies are used to provide visitors with relevant ads and marketing campaigns. These cookies track visitors across websites and collect information to provide customized ads.